篇首语:本文由编程笔记#小编为大家整理,主要介绍了使用Node.jsMongoDBFastify 构建API服务相关的知识,希望对你有一定的参考价值。

在现代WEB开发中,数据交互是主要需求,那么对于前后端数据交互来说,REST API 就是其中的数据交互设计的一种,如何设计 REST API ? 对 API 体验至关重要,API 设计的好坏直接影响开发效率,这里就不详细展开介绍,如对 API 设计有兴趣可以参阅《API端点/资源命名最佳实践》、《9个REST API设计的基本准则》。
本文介绍使用 Node.js、MongoDB、Fastify 和 Swagger构建API服务。
该项目的源代码地址:https://github.com/QuintionTang/restful-api
下面是需要用到的技术框架如下:
mongodb 对象建模框架;需要安装的环境:
打开终端创建项目目录 mkdir restful-api ,进入目录创建代码文件夹 mkdir src,再进入目录 src ,创建文件 index.js。
回到项目根目录初始化项目 npm init,完成后,将会在项目目录中生成package.json文件。
接下来,将安装所需的依赖项:
npm install nodemon mongoose fastify fastify-swagger boom --save
下面对安装的相关依赖包进行简单的介绍,都是来自官方的介绍:
是一个工具,通过在检测到目录中的文件更改来自动重新启动 Node.js 应用服务,减少手动重启的繁琐。
nodemon 不需要对代码或开发逻辑进行任何额外的更改,只需要更改项目启动方式,修改 package.json 文件,如下:
"dev": "nodemon --trace-warnings ./src/index.js",
Mongoose 提供了一个直接的、基于模式的解决方案来为应用程序数据建模。它包括内置的类型转换、验证、查询构建、业务逻辑挂钩等,开箱即用。
Fastify 是一个高度专注于以最少的开销和强大的插件架构提供最佳开发者体验的 Web 框架。它的灵感来自 Hapi 和 Express,算是最快的 Web 框架之一。
Fastify 的 Swagger 文档生成器,它使用在路由中声明的模式来生成符合 swagger 的文档。
boom 提供了一组用于返回 HTTP 错误的实用程序。
打开文件 src/index.js ,增加如下代码:
const fastify = require("fastify")(
    logger: true,
);
// 定义路由
fastify.get("/", async (request, reply) =>
    return  message: "Hello Restful Api" ;
);
// 启动服务
const start = async () =>
    try
        await fastify.listen(8100);
        fastify.log.info(`服务运行端口: $fastify.server.address().port`);
     catch (err)
        fastify.log.error(err);
        process.exit(1);

;
start();
引入 Fastify 框架,声明项目的第一个路由,并定义服务运行端口 8100 ,初始化 Fastify 时启用了内置 logger,默认情况下是禁用的。
const fastify = require("fastify")(
    logger: true,
);
现在可以在终端的项目根目录中运行以下代码:
npm run dev
打开浏览器输入 http://127.0.0.1:8100/ 可以看到返回的信息如下:
"message":"Hello Restful Api"
接下里来设置数据库 MongoDB。
成功安装 MongoDB 后,可以打开一个新的终端窗口并通过运行以下命令启动 MongoDB 实例:
mongod
使用 MongoDB,不需要创建数据库。可以在设置中指定一个名称,一旦存储数据,MongoDB 就会创建这个数据库。
打开文件 src/index.js ,增加如下代码:
const mOngoose= require("mongoose");
// 连接数据库
mongoose
    .connect("mongodb://localhost/crayon-restful-service")
    .then(() => console.log("MongoDB 已连接"))
    .catch((err) => console.log(err));
在上面的代码中,使用 Mongoose 创建并连接 MongoDB 数据库,该数据库名为 crayon-restful-service,如果一切顺利,将在终端中看到 MongoDB 已连接。
在数据库已经启动并运行,可以创建项目的第一个数据模型。在 src 目录中创建文件夹 models ,并在其中创建文件 Coffee.js 并增加以下代码:
const  Schema, model  = require("mongoose");
const coffeeSchema = new Schema(
    title: String,
    ratio: String,
    cup: String,
    description: String,
);
module.exports = model("Coffee", coffeeSchema);
上面的代码声明了 coffeeSchema,其中包含与 Coffee 相关的基本信息,然后导出 coffeeSchema 以便后面应用程序中使用。
在 src 目录中创建文件夹 controllers ,并在该文件夹中创建文件 coffeeController.js 代码如下:
const boom = require("boom");
// 导入数据 Models
const Coffee = require("../models/Coffee");
// 获取所有的 Coffees
exports.getList = async (req, res) =>
    try
        const coffees = await Coffee.find();
        return coffees;
     catch (err)
        throw boom.boomify(err);

;
// 通过ID获取单个Coffee信息
exports.get = async (req, res) =>
    try
        const id = req.params.id;
        const coffee = await Coffee.findById(id);
        return coffee;
     catch (err)
        throw boom.boomify(err);

;
// 新增
exports.add = async (req, res) =>
    try
        const coffee = new Coffee(req.body);
        return coffee.save();
     catch (err)
        throw boom.boomify(err);

;
// 更新
exports.update = async (req, res) =>
    try
        const id = req.params.id;
        const coffee = req.body;
        const  ...updateData  = coffee;
        const update = await Coffee.findByIdAndUpdate(id, updateData,
            new: true,
        );
        return update;
     catch (err)
        throw boom.boomify(err);

;
// 删除
exports.delete = async (req, res) =>
    try
        const id = req.params.id;
        const coffee = await Coffee.findByIdAndRemove(id);
        return coffee;
     catch (err)
        throw boom.boomify(err);

;
上面的代码看起来有点多,但实际上只是实现了数据库的 CURD 简单。
boom 来处理:boom.boomify(err)。await 表达式,该表达式暂停异步函数的执行并等待结果传递的 Promise 来解析,并返回解析的值。try/catch 语句中。req(请求)和 res(响应)。同样在 src 目录中创建文件夹 routes ,并在目录中创建文件 index.js ,新增以下代码:
const coffeeCOntroller= require("../controllers/coffeeController");
const APIPATH = "/api/";
const VERSION = "v1";
const ENDPOINT = "/coffees";
const getFullPath = (method = "") => `$APIPATH$VERSION$ENDPOINT$method`;
const routes = [

        method: "GET",
        url: getFullPath(),
        handler: coffeeController.getList,
    ,

        method: "GET",
        url: getFullPath("/:id"),
        handler: coffeeController.get,
    ,

        method: "POST",
        url: getFullPath(),
        handler: coffeeController.add,
    ,

        method: "PUT",
        url: getFullPath("/:id"),
        handler: coffeeController.update,
    ,

        method: "DELETE",
        url: getFullPath("/:id"),
        handler: coffeeController.delete,
    ,
];
module.exports = routes;
上面的代码定义了接口路由,并设置其控制器方法。每个路由都由一个方法、一个 URL 和一个 handler 处理程序组成,配置应用程序在访问其中一个路由时使用哪个控制器方法。
一些路由后面的 :id 是表示向路由传递参数的常用方式,可以按照下面的方式传递参数 id:
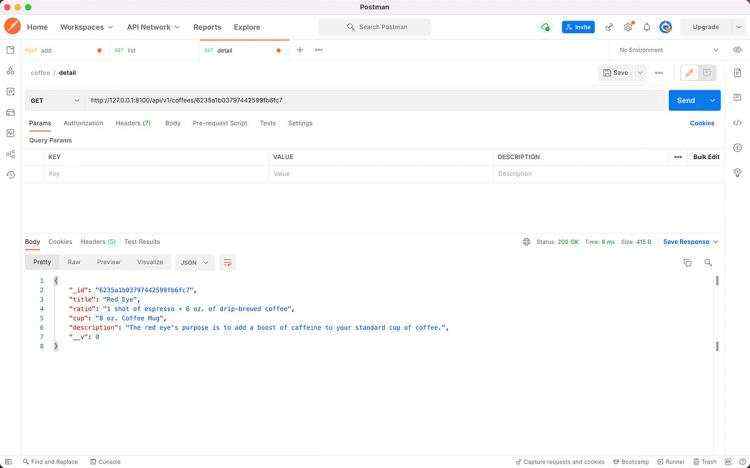
http://127.0.0.1:8100/api/v1/coffees/6235a1b03797442599fb6fc7
一个好的 API 服务需要齐全的说明文档,过去都是手动排版编写,现在这些事情都可以借助工具。本文将使用 Swagger 来对文档进行支持。
在 src 目录中创建文件夹 config ,并在目录中创建文件 swagger.js ,新增以下代码:
exports.optiOns=
    routePrefix: "/api/v1/helper",
    exposeRoute: true,
    swagger:
        info:
            title: "Coffee Restful API",
            description:
                "使用Node.js、MongoDB、Fastify 和 Swagger 构建基于 RESTFUL 风格的咖啡 API",
            version: "1.0.0",
        ,
        stripBasePath: true,
        host: "localhost",
        basePath: "/api/v1",
        externalDocs:
            url: "https://swagger.io",
            description: "更多信息",
        ,
        schemes: ["http"],
        consumes: ["application/json"],
        produces: ["application/json"],
    ,
;
上面的代码是 Swagger 的简单配置,将其传递给 fastify-swagger 插件,需要将以下添加到 src/index.js 文件中:
const swagger = require("./config/swagger");
然后将以下代码添加到 fastify 定义之后,如下:
const fastify = require("fastify")(
    logger: true,
);
fastify.register(require("fastify-swagger"), swagger.options);
然后,需要在初始化 Fastify 服务器后添加一下代码:
await fastify.listen(8100);
fastify.swagger();
现在在浏览器中打开 http://localhost:8100/api/v1/helper,可以看到以下内容:
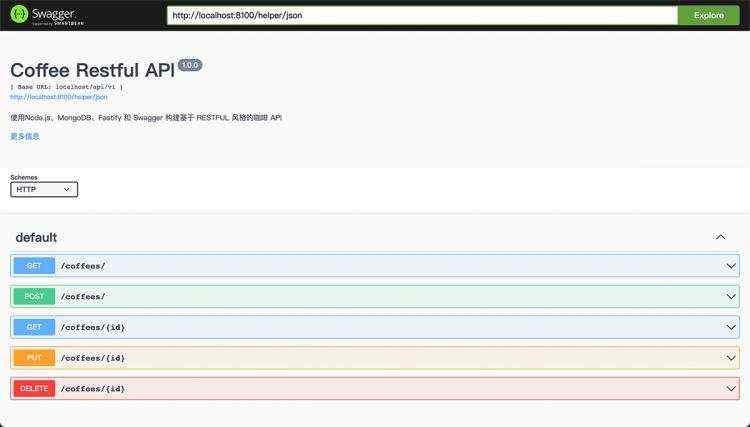
从上图可以看出,接口没有任何的说明,接下来需要增加详细的接口说明信息。
在 src 目录中创建文件夹 docs ,并在目录中创建文件 coffess.js ,新增以下代码:
const coffeeBody =
    type: "object",
    properties:
        _id:  type: "string" ,
        title:  type: "string", description: "种类名称" ,
        ratio:  type: "string" ,
        cup:  type: "string" ,
        description:  type: "string" ,
        __v:  type: "number" ,
    ,
;
exports.coffeesSchema =
    list:
        description: "获取咖啡种类列表",
        tags: ["coffees"],
        summary: "获取所有的咖啡种类列表",
        response:
            200:
                description: "获取成功",
                type: "array",
            ,
        ,
    ,
    detail:
        description: "获取咖啡种类详情",
        tags: ["coffees"],
        summary: "通过id获取咖啡种类详情",
        querystring:
            type: "object",
            properties:
                id:
                    type: "string",
                ,
            ,
        ,
        response:
            200:
                description: "获取成功",
                ...coffeeBody,
            ,
        ,
    ,
    add:
        description: "创建新的咖啡种类",
        tags: ["coffees"],
        summary: "增加新的咖啡种类",
        body:
            ...coffeeBody,
        ,
        response:
            200:
                description: "创建成功",
                ...coffeeBody,
            ,
        ,
    ,
    update:
        description: "更新咖啡种类详情",
        tags: ["coffees"],
        summary: "通过id 更新咖啡种类详情",
        querystring:
            type: "object",
            properties:
                id:
                    type: "string",
                ,
            ,
        ,
        body:
            ...coffeeBody,
        ,
        response:
            200:
                description: "更新成功",
                ...coffeeBody,
            ,
        ,
    ,
    delete:
        description: "删除咖啡种类详情",
        tags: ["coffees"],
        summary: "通过id删除咖啡种类详情",
        querystring:
            type: "object",
            properties:
                id:
                    type: "string",
                ,
            ,
        ,
        response:
            200:
                description: "删除成功",
                type: "string",
            ,
        ,
    ,
;
修改文件 routes/index.js,导入上面定义的API文档,如下:
const coffeesSchema = require("../docs/coffees");
然后再修改每个路由,增加属性 schema,再次打开文档页面,效果如下:
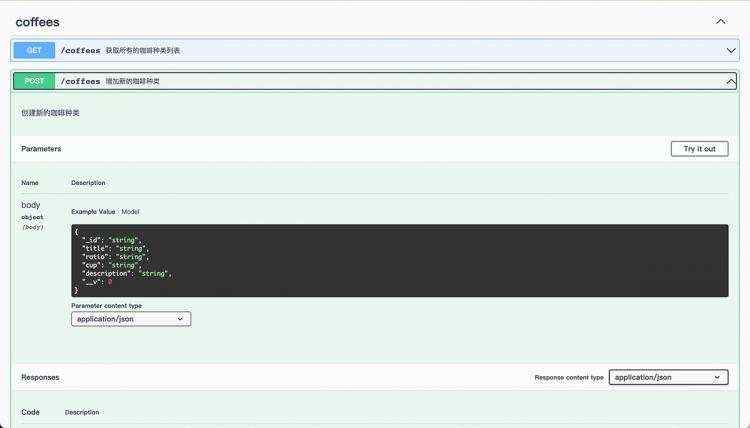
至此已经构建了大部分模块,只需要将它们连接在一起,即可开始通过 API 提供进行数据交互。
首先,需要将以下代码添加到 src/index.js 文件中来导入路由信息:
const routes = require("./routes");
然后需要用 Fastify 遍历 routes 数组来进行初始化,将以下代码添加到 src/index.js 文件中:
routes.forEach((route, index) =>
    fastify.route(route);
);
到此一个简单的 REST API 服务已经完成, 可以准备开始测试了!
测试 API 最佳的工具就是 Postman,它可以模拟 API 的数据进行测试。
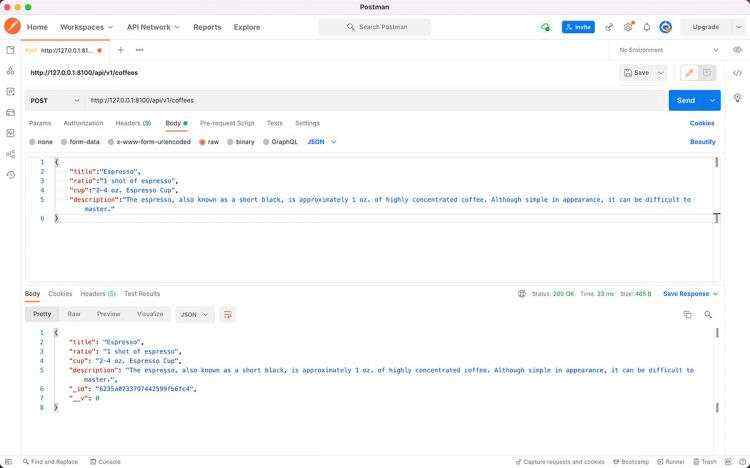
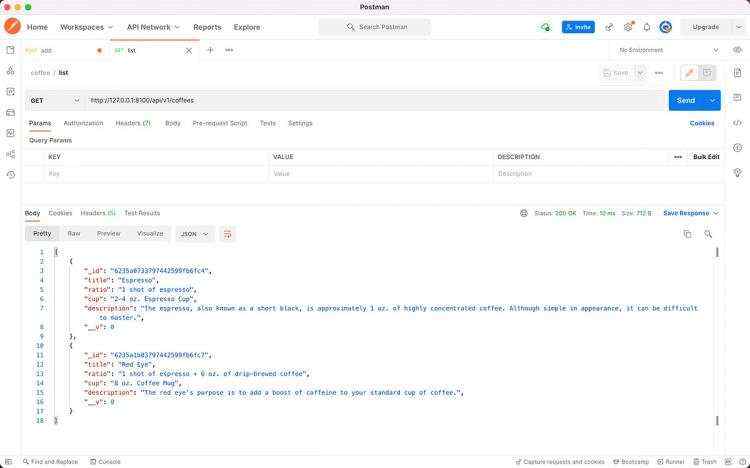
关于Node.js构建的服务,在部署中可以通过 pm2 来启动,或者通过 docker 来部署,这里就不展开介绍了,推荐两个相关内容:
到这里一个完整的 REST API 构建完成,只是一个简单的示例,可以作为 Node.js 后端服务的基础,在此基础上迭代更加丰富的服务。目前实例没有加入model 字段的验证规则、列表的分页等复杂逻辑,后续可以持续迭代,文章中创建目录的过程可以通过构建脚手架插件在项目初始化的过程中自动完成目录及文件的创建。
在下一篇文章《在 Node.js 中使用 Yaml 编写API文档》介绍使用 Yaml 编写API文档,将文档与接口实现分离。

 京公网安备 11010802041100号 | 京ICP备19059560号-4 | PHP1.CN 第一PHP社区 版权所有